The Level Editor
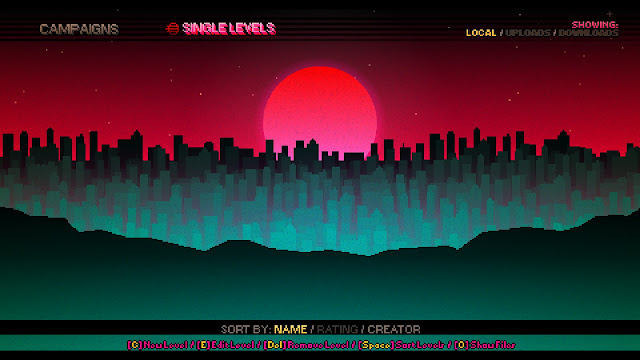
When you start the editor this is the screen you will see. It will contain all of your levels and campaigns, and you will use this menu to play and edit your levels.

To create a new level press C on your keyboard. To edit your level press E. To remove a level press Delete. To sort your levels press Space. To add custom graphics press O (the letter not the number).
Pressing Escape lets you toggle between Campaigns and Levels using your arrow keys or A/D. Pressing Escape again returns you to the main menu of the game.
Pressing Shift you can choose whether to see local, uploaded or downloaded levels/campaigns, for easier browsing.
Creating a new level

Start creating a new level by pressing C, you will be asked if you want to create a new level, select "Yes". You will then be greeted by the screen above.

First you need to choose some level settings. Here you can enter a title for your level, select which player character you want to use and the music you want to play.
After you've made your selections let's take a brief detour and look at the top menu. You access this menu by holding your mouse pointer at the top of the screen.

The File menu handles saving, loading and playing your level, as well as creating campaigns and publish your creations (publishing not available in the beta). This is also where you go to quit the editor.
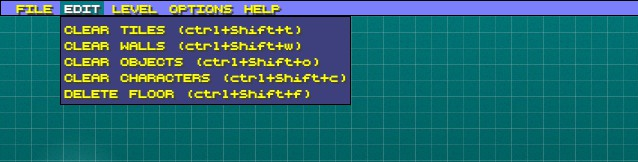
The Edit menu is for quickly removing tiles, walls, objects, characters or whole floors (if you have a multi floor level that is).
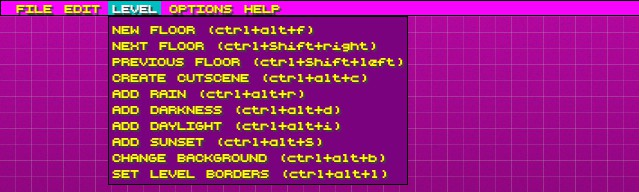
The Level menu allows you to create new floors or toggle between them, it also allows you to access the cutscene editor (more information about that later), set level borders and add graphical effects.

The Option menu allows you to change the level settings you were prompted to enter upon creating your new level. Here you can switch player, change your level title or its music. You can also choose to disable the grid and the wall guide (not recommended). The wall guide is used when creating a level with multiple floors so that you can see the layout of the floor beneath or above.
Alright, with that out of the way, let's take a look at the actual editor. The editor window is divided into five different tabs: Build, Items, Enemy, Misc and Level. The first tab you might want to take a look at is Build.

Here you can place floor tiles as well as create walls, doors and windows. There are a number of tools to make this easier.
 The Capsule Tool
The capsule tool allows you to add walls and tiles at the same time creating a new room. You will need to select which walls you want to add and what tile to use for the floor of your room individually. To create your room simply click and drag your mouse pointer anywhere in the grid area.
 The Fill Tool
The fill tool should be familiar to most, with it you can easily change the tiles of a room or an area. Just select the new tile you want and click on any floor to replace it.
 The Sample Tool
The sample tool allows you to easily find a specific tile you have already used in your level. Simply click the tool and then click the tile you want sampled. The floor tile and the tileset it's a part of will be highlighted in the tile selection window.
 The Wall Capsule Tool
The wall capsule tool works like the capsule tool, except it doesn't place any floor tiles.
You can also place walls and tiles freely by deselecting all of the tools above. Then simply click and drag to place your tiles/walls. Hold shift and press the right mouse button to switch between horizontal/vertical walls.
To erase walls or floor tiles, simply right click and drag your mouse across them. Note that you have to have the wall selection window active to delete walls and the tile selection window active to remove tiles.

There are a few additional options when placing doors, when selecting a door in the wall window you will see two checkboxes pop up beneath it. One saying "Locked" and the other "Cutscene".

Ticking one of the checkboxes means the door you then place will receive a specific property. "Locked" means that the door will not open. "Cutscene" means that the door will only open once all enemies are cleared from the floor. This feature was mainly added so that you can create a cutscene on a floor with enemies, keeping the player from triggering it before he's killed all enemies.
Once you're done creating the basic layout of your level it's time to move on to the next part.
 The Barrier Tool
Select the Barrier Tool to place one way barriers where you want the player to be able pass through an opening but not exit back through it. To place the barrier simply click the space where you want to add it, then before letting go of the left mouse button drag up/down or left/right to indicate which way the barrier should be passable.

 The Invisible Wall Tool
You may want to place invisible walls to seal of spaces you don't want the player to be able to move. Use the Invisible Wall Tool for this. Once you have clicked the symbol, simply click and drag to place invisible walls horizontally, vertically or diagonally.
The Invisible Wall Tool
You may want to place invisible walls to seal of spaces you don't want the player to be able to move. Use the Invisible Wall Tool for this. Once you have clicked the symbol, simply click and drag to place invisible walls horizontally, vertically or diagonally.
The Barrier ToolSelect the Barrier Tool to place one way barriers where you want the player to be able pass through an opening but not exit back through it. To place the barrier simply click the space where you want to add it, then before letting go of the left mouse button drag up/down or left/right to indicate which way the barrier should be passable.
The Invisible Wall Tool
Adding Furniture
To make your level a bit more aesthetically pleasing you may want to add some furniture. To do so, simply click the next tab in the editor window called "Items".

This is the furniture browser. You can click the top most field to enter keywords which will make it easier to find the furniture you want. Most of the furniture and various objects from the game can be found here. Click the name of an item you want to see and it will be shown in the preview window below. Some items have a few different variations which you can toggle between with the arrow buttons underneath the preview window. Once you've made your selection simply click anywhere in the grid area to place a furniture of your choice.
You can hold shift and right click to change the orientation of the object (before placing it) or hold control and click an object you've already placed to move it (note that if two objects occupy the same space, the first placed object will be picked up). Holding shift will also snap your object to walls.
At the very top you also have two checkboxes giving you the option to either place "Furniture" or "People". We've already gone through the furniture so let's place some people. Star by clicking the "People" checkbox.

The "people" you can place in this menu are static NPCs that cannot be interacted with, ideally used for intros and outros. You can choose to either have your NPC completely static, or cycle through an animation at a specified speed. To specify the animation speed use the slider below the preview window.
Placing and orienting your NPCs are done the same way as placing the furniture.
Placing Enemies

In the third tab called "Enemy" you get to place enemies. At first you may want to choose which faction of enemies you want to use (some player characters can only fight one specific faction). To do so, simply click the arrow buttons right beneath the "Enemy" tab.
Once you've chosen your faction you see a bunch of different enemy types. Each enemy type has a different AI behavior. The behavior should be apparent by each types label, but there is also a brief description of the selected type beneath the enemy selection window.
Most enemy types have a set of check boxes that will appear beneath the enemy selection window. Here you can choose what weapon you want the enemy to carry. Note that we have separated enemies with guns from enemies with melee weapons.
It's important to note that human enemies patrol anti-clockwise while dogs patrol clockwise. This means you have to place patrolling enemies accordingly.
Placing Weapons

To place weapons on your level, go to the "Misc" tab. The weapon selection window will show what weapons are available for the character and enemy faction you have chosen. To place a weapon simply click the one you want in the weapon selection window and then click in the grid area.
Placing the Player

To place the player character and vehicle, go to the "Level" tab. The first window you will see on your left is the character window. If this window is empty it means that you don't need to place the player character in order for your level to work. If you want to place a specific player character (let's say Corey from the Fans or give Jacket a pre-selected mask) you will see arrows in the character window if you hover your mouse over it. Click the arrows to cycle through the available masks, characters or styles.
In order to place your character the character window will need to be active (shown by a yellow border around it). To activate the character window simply click it. Once the character window is active you can click anywhere in the grid area to place your character. The same applies to the vehicle window located to the right of the character window.
In the "Level" tab you can also change the author of the level, add a date and location, enter the maximum score for your level (which will be used to calculate the grading for people playing it), as well as quickly change the title of your level.

You will also see a blank cover next to these text fields. By clicking it you can select a custom cover to be used for your level in the Custom Level Selection screen. Your covers need to be stored in the following folder to be available: /my documents/my games/hotlinemiami2/covers. It's also very important that your covers have the required size (34x57 32-bit PNG) otherwise it will not appear.
Finally, the "Level" tab has the tool you will need to use to create transitions between floors in a multi floor level.
Creating Multiple Floors
To create a level with multiple floors you first need to go to the Top Menu, go to the Level Menu and select "New Floor". This will bring up a new empty floor, and if your previous floor had any walls, these should be shown in green (if the wall guide is enabled) to easier let you design the layout of your new floor. Make sure you design a clear transition area that connects between the floors (like a staircase). In the lower left corner of the screen you will see two or more of these symbols marking how many floors your level has and which floor you are currently editing.

Once you're done designing your new floor it's time to add a transition point. This can be a little bit tricky as you have to make sure you place them correctly or you may trap the player in a loop. To start with, click the Floor Transition button found under the "Level" tab. Your mouse pointer should now be a line with two arrows pointing in opposite directions.
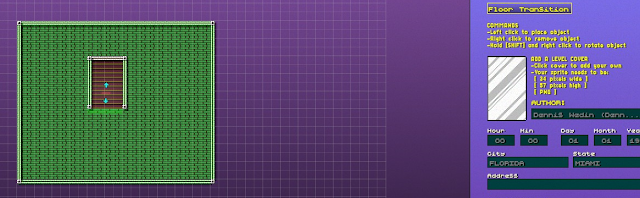
If your staircase is leading up or down, you want to have a horizontal transition point (horizontal line with an arrow pointing up and one pointing down). To change the orientation of the transition point, hold shift and click the right mouse button. Once you have the correct orientation, hold your mouse pointer where you want to place the transition point, then hold down your left mouse button (and don't release). While holding down the left mouse button you can move your mouse up or down, this will make the bobbing arrow point in the direction of your mouse and indicate which direction you want the player character to move while transitioning between floors.

Once you're satisfied you release your left mouse button. A menu will pop up asking what floor you want your transition point to connect to. If your level only has two floors, the correct floor will be pre-selected.
Now it's time to add a transition point from the second floor back to the first. This is where you can accidentally create a loop between floors. In order to avoid this, make sure that the transition points are pointing away from each other, and that they don't overlap. If the transition points are pointing towards each other, the player can easily become trapped in between them.


(This is a correctly placed transition between floors)


Besides placing regular floor transitions you can also place elevators. To do this, press "Elevator" next "Floor Transition". Placing the elevator works the same as placing any furniture. Once you've placed the elevator you will get the same prompt as when placing a regular floor transition.
Here you can choose what floor to transition to, as well as an offset in case you want the player to start in a different position on the new floor (if you for instance place an elevator at the top of the current floor, but want the elevator to be placed at the bottom of the next floor).
Adding Juice To Your Level
Once your level is done, you might want to add some extra flair. The level editor has a set of different graphical effects to spice things up. Head back to the Top Menu.
In the Level Menu here you can add things like rain, darkness, change background and sunshine. While most are easy to toggle on and off, a couple might need a short explanation.
Start by clicking "Add Rain". This will make rain start falling down on your entire level. If you would like to keep the rain from falling in certain areas (like in-door environments), you can now click and drag over areas you want to stay dry. Once you're done, right click to go back to editing your level.


Adding darkness works pretty much the same way as adding rain. Simply click and drag over the areas you want to be dark, then right click to finish.

Creating A Campaign
Once you have a couple of levels you may want to turn them into a campaign. Start by naming your campaign (it's easy to forget this), and if you want you can click the box cover displayed on the right to add your own custom box cover art. Your covers need to be stored in the following folder to be available: /my documents/my games/hotlinemiami2/covers. It's also very important that your covers have the required size (41x65 32-bit PNG) otherwise it will not appear.

Each level in a campaign consists of three parts. An intro level, a main level, and an outro level. The intro and outro parts are optional, but there must always be a main level. None of the parts need to be cutscene focused or gameplay focused, you can mix it up however you want. Press the add button next to each part to select one of the levels you've made.
Once you've added the parts you want you can choose to add a new campaign level by pressing the "+" button. Your campaign now has two levels. Now you need to specify intro/main/outro for the new level as well. If you want to delete a level, press the "-" button next to the "+". Note that pressing "-" will remove the level you added last, not the level you are currently viewing. So make sure you don't screw up the order of your campaign.
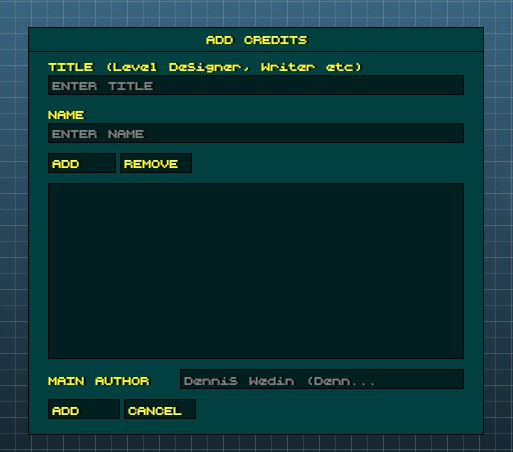
To save your campaign, make sure to press "Save".
Cutscene Editor
To access the cutscene editor go to the top menu, under "Level" select "Create Cutscene". This will take you to the Cutscene Editor.

The first thing you want to do when creating a cutscene is to add a trigger. Triggers activate the cutscene. To add a trigger you can click Add Trigger, to create an area based trigger, or right-click a NPC if you want to add a character based trigger. A cutscene can have several triggers, we'll discuss that further down.

If you select an area based trigger you will have to draw a rectangle which will trigger the cutscene if the player moves inside the marked area. How to add a character based trigger will be discussed further down.
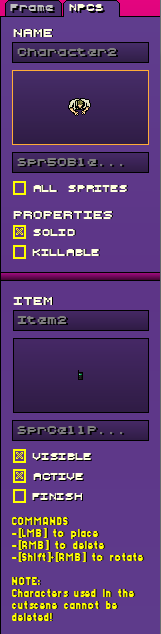 To add NPCs and items, go to the NPC tab in the cutscene editor. Here you can choose whether to place NPCs or Items, as well as giving them starting attributes.
When placing an NPC you want to first give the NPC a name, this makes it easier to add character based actions when creating your cutscene. To give your character a name press the field with the text "Character2". To select your NPCs starting sprite, press the field below the sprite preview window, a list will open with the currently available sprites. By clicking the checkbox labeled "All Sprites" you can choose between various non-character sprites as well.
Finally you can choose whether your NPC will be killable for the player and if it is solid or if you'd prefer the player to be able to pass through your NPC. Note that many of the NPC sprites are limited to one or two sprites, meaning they may not have associated walk, attack or death animations.
Click the NPC sprite preview window when your ready to place your character in the level.
Besides NPCs you can also add Items. These can be picked up by the character when active. You can choose whether the item should be visible and/or active when the room starts. You can also choose whether picking up the item will trigger the cutscene (and level) to be cleared.
There are further actions available to activate items and making them visible during a cutscene.
Like with your NPCs it may be good to name your Items and you name them, place them as well as choose their starting sprites in the same way you do with NPCs.
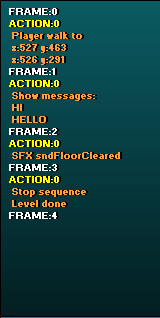 A cutscene consists of three elements. Actions that say what is supposed to happen, frames which say when the actions are supposed to happen and in what order, and sequences that determine when the cutscene is active and when it's not.

To add dialogue to your cutscene, press "Add Dialogue".
Here you can enter two lines of dialogue, choose a face to be displayed during the dialogue you have entered and select which character the camera will focus on during these specific lines. You can press the "+" symbol to add further lines of dialogue, here you can choose if you want the same character to do the talking or choose a new character and face. You can also press "-" to remove the last entered lines of dialogue.

If you want to add a dramatic pause or wait for an animation to finish press the "Wait" button in the Actions Menu. Here you can choose a period of time that the game will wait before the cutscene continues to the next Frame.

To play any of the game's sound effects, press "Play Sound" in the Actions Menu. Click the sound name displayed in the middle of the window to open a list where you can select a sound effect. You can press "Play" to preview the selected sound effect.

To change music during you cutscene press "Play Song" in the Actions Menu. Click the song name displayed in the middle of the window to open a list where you can select a song. You can press "Play" to preview the selected song.

To stop the currently playing music press "Stop Song" in the Actions Menu. You can choose if you want the song to stop instantly or fade out over a period specified by the slider in the middle of the window.

To give the player back control over his character press "Stop Sequence". You can choose whether this action will complete the current level (allowing the player to move onto the next one by entering his vehicle) or if you want to create a multi-segmented cutscene with another trigger.

To automatically transition to the next level without the player having to walk back to his vehicle, select "Next Level". Here you can choose if you want the transition to be instant or fade to black over a period of time set by the slider in the middle of the window.

If you want the player to be able to pick up or interact with an item at a specific point in your cutscene, you can use the "Activate Item" action. You can select here if you want an item to become interactable and/or visible using the checkboxes. Click the item name in the middle of the window to choose which item you want to apply the action to.

You will see a list of character actions available to choose from.

If you want a character to automatically move to a certain position use the "Walk To" action. This will allow you to place a set of waypoints leading to the desired location. You can add a total of five waypoints in one walk action. Note that the first walkpoint is placed where the character triggers the action (and is displayed on top of the character in the cutscene editor). Once you're done you can right click to finish the path, or press delete to remove the last added waypoint.

Once you've added the path you can choose how fast you want the character to walk, or press "Redo" to redraw the character's path.

To change the sprite of a character press "Change Sprite" in the Character Actions Menu. Click the sprite name in the middle of the window to open a list of available sprites to choose from.

To play the animation associated with a character's sprite click "Animate Sprite". You have a few different options on how to animate the sprite. You can choose if you want the animation to loop, loop with a short interval between loops, have the animation loop freely regardless of current cutscene frame, or to stop an animation.

To make a character attack choose the "Attack" action. This will automatically make your character perform an attack that's associated to the character's current sprite (if there is one). You can choose which direction you want the character to face when attacking by either manually choosing one or automatically target any of the characters placed on the current floor. You can also choose whether you want your character to keep attacking during the current frame or just attack once. If a killable NPC is within the range of the attack he will automatically be killed.

If you want to manually trigger the death of a character you can use the "Die" action. This only works if the character's current sprite has an associated death sprite. You have four different options for how you want the character to die.

If you want a character to rotate towards something, use the "Rotate" action. Click within the circle on the right to choose a new direction. If the checkbox labeled "Snap" is checked you will have 8 different directions to choose from. Unchecking it will allow you to choose freely what direction you want the character to face. The "Animate" checkbox makes the character visible rotate towards the given direction. Choose instant if you want the character to change direction instantly.

To change the properties of an NPC (not possible for the player character) use the "Properties" option in the Character Actions Menu. Here you can rename the character, change it's starting sprite, select whether the NPC is solid or if the player should be able to pass through him, as well as whether the NPC is killable.
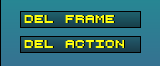 To remove frames and actions there are two buttons beneath the Cutscene Overview Window, labeled "Del Frame" and "Del Action". Deleting a frame with a trigger associated to it will also delete the trigger. To bybass a cutscene entirely, remove all frames and triggers. Note that a cutscene with no actions or triggers will be bypassed along with all items and NPCs placed.
 When creating a cutscene on a floor that has no player character, the editor will add a temporary player character symbol which can be used the same way as the normal player character.

The first thing you want to do when creating a cutscene is to add a trigger. Triggers activate the cutscene. To add a trigger you can click Add Trigger, to create an area based trigger, or right-click a NPC if you want to add a character based trigger. A cutscene can have several triggers, we'll discuss that further down.

If you select an area based trigger you will have to draw a rectangle which will trigger the cutscene if the player moves inside the marked area. How to add a character based trigger will be discussed further down.
Adding NPCs and Items
 To add NPCs and items, go to the NPC tab in the cutscene editor. Here you can choose whether to place NPCs or Items, as well as giving them starting attributes.
When placing an NPC you want to first give the NPC a name, this makes it easier to add character based actions when creating your cutscene. To give your character a name press the field with the text "Character2". To select your NPCs starting sprite, press the field below the sprite preview window, a list will open with the currently available sprites. By clicking the checkbox labeled "All Sprites" you can choose between various non-character sprites as well.
Finally you can choose whether your NPC will be killable for the player and if it is solid or if you'd prefer the player to be able to pass through your NPC. Note that many of the NPC sprites are limited to one or two sprites, meaning they may not have associated walk, attack or death animations.
Click the NPC sprite preview window when your ready to place your character in the level.
Besides NPCs you can also add Items. These can be picked up by the character when active. You can choose whether the item should be visible and/or active when the room starts. You can also choose whether picking up the item will trigger the cutscene (and level) to be cleared.
There are further actions available to activate items and making them visible during a cutscene.
Like with your NPCs it may be good to name your Items and you name them, place them as well as choose their starting sprites in the same way you do with NPCs.
How a cutscene works
A cutscene consists of three elements. Actions that say what is supposed to happen, frames which say when the actions are supposed to happen and in what order, and sequences that determine when the cutscene is active and when it's not.
You start by adding actions. The actions you add are placed in a frame, and all actions in a frame will be executed simultaneously, and they must all be completed before the cutscene moves over to the next frame. So, let's say you want the player to walk up to an NPC and start a dialogue. First you right click the player and add a "Walk To" action, you then specify a path to the NPC. Then you add a new frame by clicking "Add Frame". After that you add the dialogue action. Finally you need to add a "Stop Sequence" action. The "Stop Sequence" action breaks the cutscene and returns control to the player, and it also has the option of triggering the "Level Clear" state. If you want to add further content to your cutscene you must then add a new trigger.
Adding Actions
After you have placed a trigger it's time to add actions. You can either create general actions (like playing sounds or transition between levels) by pressing "Add Action" or character actions (like walking or attacking) by right-clicking on the player or an NPC.General Actions

To add dialogue to your cutscene, press "Add Dialogue".

Here you can enter two lines of dialogue, choose a face to be displayed during the dialogue you have entered and select which character the camera will focus on during these specific lines. You can press the "+" symbol to add further lines of dialogue, here you can choose if you want the same character to do the talking or choose a new character and face. You can also press "-" to remove the last entered lines of dialogue.
If you want to add a dramatic pause or wait for an animation to finish press the "Wait" button in the Actions Menu. Here you can choose a period of time that the game will wait before the cutscene continues to the next Frame.
To play any of the game's sound effects, press "Play Sound" in the Actions Menu. Click the sound name displayed in the middle of the window to open a list where you can select a sound effect. You can press "Play" to preview the selected sound effect.
To change music during you cutscene press "Play Song" in the Actions Menu. Click the song name displayed in the middle of the window to open a list where you can select a song. You can press "Play" to preview the selected song.
To stop the currently playing music press "Stop Song" in the Actions Menu. You can choose if you want the song to stop instantly or fade out over a period specified by the slider in the middle of the window.
To give the player back control over his character press "Stop Sequence". You can choose whether this action will complete the current level (allowing the player to move onto the next one by entering his vehicle) or if you want to create a multi-segmented cutscene with another trigger.
To automatically transition to the next level without the player having to walk back to his vehicle, select "Next Level". Here you can choose if you want the transition to be instant or fade to black over a period of time set by the slider in the middle of the window.
If you want the player to be able to pick up or interact with an item at a specific point in your cutscene, you can use the "Activate Item" action. You can select here if you want an item to become interactable and/or visible using the checkboxes. Click the item name in the middle of the window to choose which item you want to apply the action to.
Character Actions
To specify character based actions you can right-click the player or an NPC to open up the Character Actions Menu.
You will see a list of character actions available to choose from.

If you want a character to automatically move to a certain position use the "Walk To" action. This will allow you to place a set of waypoints leading to the desired location. You can add a total of five waypoints in one walk action. Note that the first walkpoint is placed where the character triggers the action (and is displayed on top of the character in the cutscene editor). Once you're done you can right click to finish the path, or press delete to remove the last added waypoint.
Once you've added the path you can choose how fast you want the character to walk, or press "Redo" to redraw the character's path.
To change the sprite of a character press "Change Sprite" in the Character Actions Menu. Click the sprite name in the middle of the window to open a list of available sprites to choose from.
To play the animation associated with a character's sprite click "Animate Sprite". You have a few different options on how to animate the sprite. You can choose if you want the animation to loop, loop with a short interval between loops, have the animation loop freely regardless of current cutscene frame, or to stop an animation.
To make a character attack choose the "Attack" action. This will automatically make your character perform an attack that's associated to the character's current sprite (if there is one). You can choose which direction you want the character to face when attacking by either manually choosing one or automatically target any of the characters placed on the current floor. You can also choose whether you want your character to keep attacking during the current frame or just attack once. If a killable NPC is within the range of the attack he will automatically be killed.
If you want to manually trigger the death of a character you can use the "Die" action. This only works if the character's current sprite has an associated death sprite. You have four different options for how you want the character to die.
If you want a character to rotate towards something, use the "Rotate" action. Click within the circle on the right to choose a new direction. If the checkbox labeled "Snap" is checked you will have 8 different directions to choose from. Unchecking it will allow you to choose freely what direction you want the character to face. The "Animate" checkbox makes the character visible rotate towards the given direction. Choose instant if you want the character to change direction instantly.
To change the properties of an NPC (not possible for the player character) use the "Properties" option in the Character Actions Menu. Here you can rename the character, change it's starting sprite, select whether the NPC is solid or if the player should be able to pass through him, as well as whether the NPC is killable.
Miscellaneous
To remove frames and actions there are two buttons beneath the Cutscene Overview Window, labeled "Del Frame" and "Del Action". Deleting a frame with a trigger associated to it will also delete the trigger. To bybass a cutscene entirely, remove all frames and triggers. Note that a cutscene with no actions or triggers will be bypassed along with all items and NPCs placed. When creating a cutscene on a floor that has no player character, the editor will add a temporary player character symbol which can be used the same way as the normal player character.